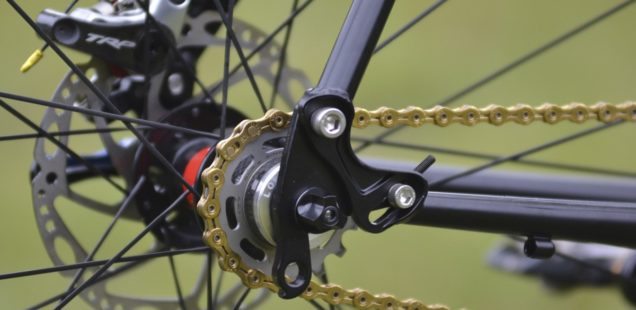
Single Speed Conversion Guide
Often overlooked in favor of more complicated drivetrains, converting your mountain, road, cyclocross or commuter bike to single speed will make it more reliable and efficient, lighter and teach you skills that will help you when using a geared bike. This single speed conversion guide explains the many ways in which you can convert to a single speed.
Why convert my bike to single speed?
It’s not for everyone. I originally converted my commuter bike to single speed after getting tired of endless tuning of front and rear derailleurs. I wanted a drivetrain that required less effort, less money to maintain and worked regardless of the weather. After converting I was blown away by how much more I enjoyed my commutes to work. I was never in the wrong gear and my mind was freer to wander as I pedalled to and from the office.
Having previously used a 2×10 drivetrain on my cross country mountain bike, I decided to convert my drivetrain to single speed and see how I enjoyed it on the trails. I’ll admit it was tough at first, but over time I learned new skills that have helped me to develop as a biker:
- braking less
- keeping more speed and “flowing” through corners and trail features
- “absorbing” trail features with my body to keep momentum rather than plowing and slowing down
- pedalling into a descent (before you are going too fast to be able to pedal)
- sprinting before a climb
- ratchet pedalling
Riding a single speed whether it was on the trails or on the road is fun!
Single Speed Conversion: What Do I Need?
Budget Single Speed Conversion
A basic single speed conversion needs the following:
- Removal of your smallest front chainrings so only one remains. Ideally this is a non-ramped chainring.
- A single cog on the rear. If you are on a budget, something cheap like a Shimano DX/BMX style cog will work fine.
- Cassette spacers from some old disassembled cassettes
- A method of tensioning the chain
Simple Single Speed Conversion
A better way of converting can be done for less than $100:
- A non-ramped chainring
- This can be sold as a “single speed”, Narrow Wide or 1x Chainring. You don’t need Narrow Wide for single speed, but non-NW chainrings are becoming harder to find. Make sure it is the same “BCD” as your original chainring.
- Single speed conversion kit that includes cog and spacers
- New chain
- Method of tensioning the chain
Best Single Speed Conversion Kit
The best kit for converting to single speed uses:
- Non-ramped single speed chainring – Titanium would be nice!
- A wide base single speed cog – Popular brands include:
- New chain – Personally I have had good luck using standard 9 and 10 speed chains
- Single speed rear hub – Allows you to build a stronger rear wheel with less or no dish. SS hubs are available from:
- If you don’t want the hassle of having a new rear wheel built, you can opt straight for a single speed wheelset.
For those with nicer components, keep in mind that the cheaper, skinner singlespeed cogs can bite into alloy freehub bodies quite badly – this is why I suggest using a wide base single speed cog when your budget allows.
What are ramped and non-ramped chainrings and cogs?
Ramped and pinned chainrings are designed to create a smoother shift between rings. This is great for a 2x or 3x drivetrain when we want the chain to change between rings but isn’t ideal on a single speed drivetrain.
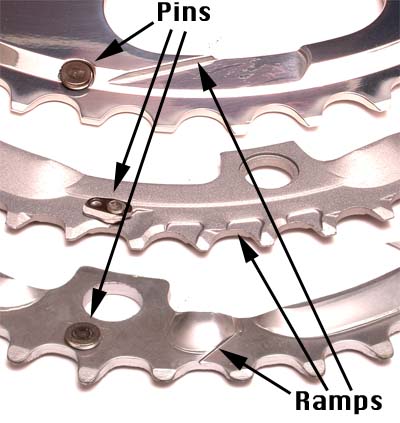
Ramped & Pinned Chainring. Photo: Sheldon Brown
While I have used both in ghetto single speed conversions, I recommend against it. It is a short term solution and you will experience shorter chain life. Please note that chain tension and chainline is crucial if you are going to use ramped rings and cogs, so keep that bike maintained!
Single Speed Gear Ratio and Gear Inches
Thankfully, Surly Bikes have written an awesome article on single speed gear ratios and gear inches. I’ll try and summarize a few things here for those who don’t want to read the whole post:
- Ratios are a good starting point but gear inches are more accurate
- The efficiency of a ratio changes with each wheel size
- What works for you may not work for someone else
- What works on one race track may not work as well on another
That said, if you want to get started on a single speed and you don’t have time to over analyze everything like me, the age old starting gear ratio for a 26″ mountain bike is 2:1. That is, if you have a 32T chainring up front, you should start with a 16T cog out back. If you are going down this track I really do suggest buying a couple of cheap Shimano cogs in different sizes to find your perfect ratio before spending up big on an expensive cog that is too big or small.
Single Speed Chain Tension
No single speed conversion guide would be complete without discussing chain tension. In order to create a reliable and enjoyable single speed bike, you will need to find a way to tension your chain. How tight should your chain be? A good guide is to have 1/2″ (12mm) of play up and down in the chain.
There are many methods for tensioning a single speed chain, but it all comes down to what frame you are using.
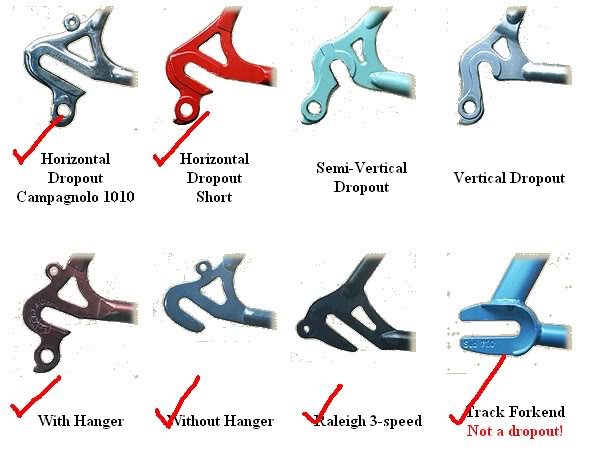
The correct dropouts will make your single speed conversion much easier. Image: Fiets.nl
Here you see the many types of dropouts commonly used on bicycle frames. If you are using a mountain bike, chances are you have a vertical dropout. The vertical dropout itself doesn’t allow a way to tension your chain, but thankfully there are other options.
Using a Single Speed Conversion Chain Tensioner
Although it is my least preferred option, using a chain tensioner is one of only two methods for adjusting chain tension on a bike with a horizontal dropout. Unfortunately it reduces the simplicity that I love about single speeds, but it’s simple and easy. If you are wanting to convert your dual suspension bike to singlespeed, you will also have to run a chain tensioner due to chain growth. The only way around this is by purchasing a new frame that uses a concentric pivot suspension design. The good news it that the cheapest chain tensioner is an old derailleur:
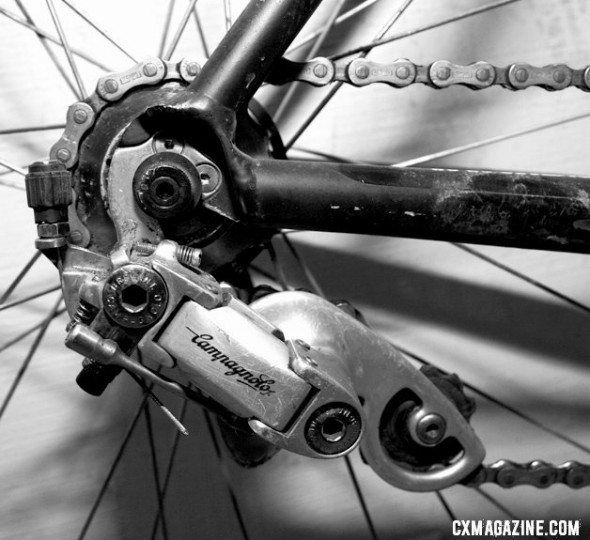
Rear Derailleur Single Speed Tensioner. Photo: Cyclocross Magazine
Proper tensioners are inexpensive and simple to set up. They are available from:
Magic Gear Ratio
The most affordable, yet least “thorough” method of converting a vertical dropout frame to single speed is by using the “Magic Gear” or “Magic Ratio”. By carefully selecting the right gear ratio, your chain length and tension is good enough to use without dropping the chain. The catch is that the ratio may not be ideal for your local hills/streets and your chain tension will change as the chain stretches.
A half link chain will allow you more flexibility with your gear ratios but will only get you so far. The magic gear ratio option is not one I’d recommend unless you are on a tight budget.
Don’t attempt a magic gear single speed conversion if you aren’t in the mood to think. Here is a great guide for the maths of the magic ratio.
Single Speed Conversion Without Tensioner
Without a doubt, a single speed conversion without tensioner is the nicest and cleanest way to go. Not only does it look the best, it is more efficient than using a tensioner, lighter and easier to maintain. I’ve used all of these options at some stage over the years and over the above two they are definitely better, but each have their pros and cons. If you are still looking for more information after reading what is below, check get The Lowdown on Single Speed Mountain Bike Frames.
Horizontal Dropouts and Track Ends
In some ways this is the simplest way to convert to single speed, though getting used to the adjustment can be tricky. By sliding the axle forwards and backwards in the dropouts you can adjust chain tension easily. It really doesn’t get much easier than track ends for those riding road/fixies with cantilever or V-brakes. Unfortunately when you add disc brakes and fenders into the mix things it becomes a lot more challenging to fix a flat tire.
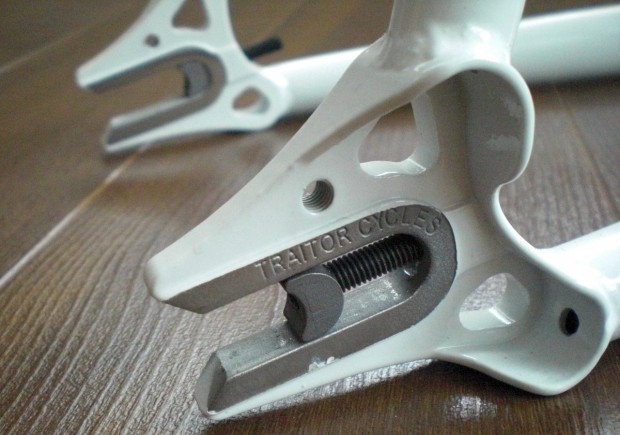
Traitor Crusade Track Ends with Inbuilt Tensioner
If you find your wheel is slipping forwards under load and loosening off your chain tension (this is quite common depending on your set up), you should try either swapping the quick release lever to the other side of the bike, purchasing a chain tug or a stronger quick release axle, or ideally a bolt on hub.
Eccentric Bottom Bracket
Originally created to solve issues with chain tension on tandem bicycles, eccentric bottom brackets are a perfect way to tension chains on single speeds, especially if you are using a bike with either disc brakes or a rear fender. By using a frame with an oversized bottom bracket shell, the standard bottom bracket is offset, allowing adjustment of the chain tension as you rotate the bottom bracket around the shell. When optimum tension is acquired, set screws are tightened to hold the EBB in place.
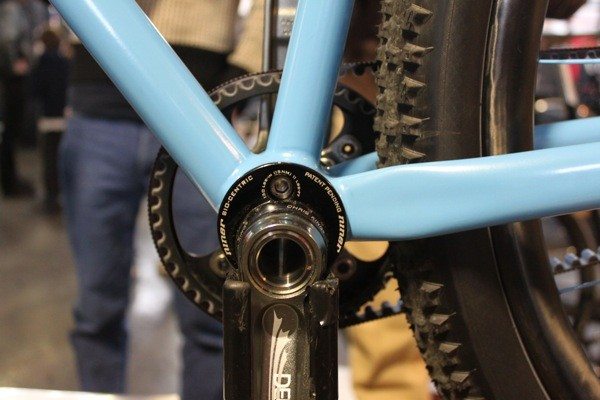
Eccentric Bottom Bracket. Photo: Bike Rumor
Older Eccentric Bottom Brackets used to creak and be an annoyance at times but technology seems to have improved this. My last EBB did not creak at all. Other things to be aware of is how they affect the geometry of your bike, most importantly the BB height and chainstay length.
Sliding Dropouts, Paragon Sliders and Swinging Dropouts
Mainly used for mountain bikes but slowly creeping into the cyclocross scene are a range of alternative dropouts allowing adjustment for chain tension but the ability to retain a quick release axle for easy rear wheel removal.
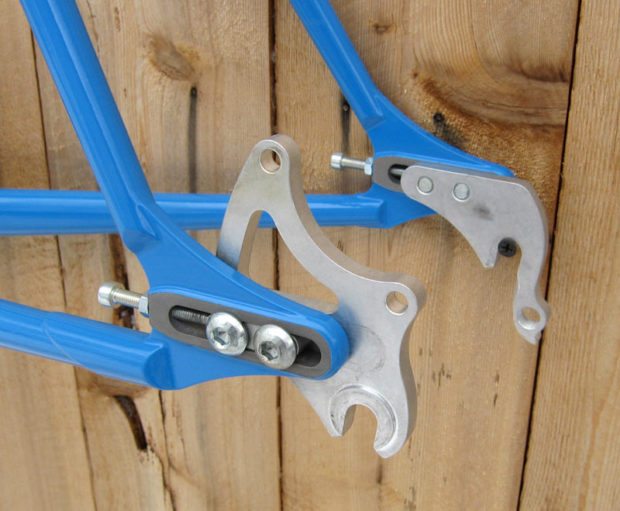
Paragon Sliding Dropouts. Photo: Clockwork Bikes
They are all a little different, so it’s hard to guide you on the reliability of these dropouts. While some can creak, again it appears that technology has fixed most of these problems. If I was choosing one of these methods, I would personally take the Swinging Dropouts as I find them more reliable.
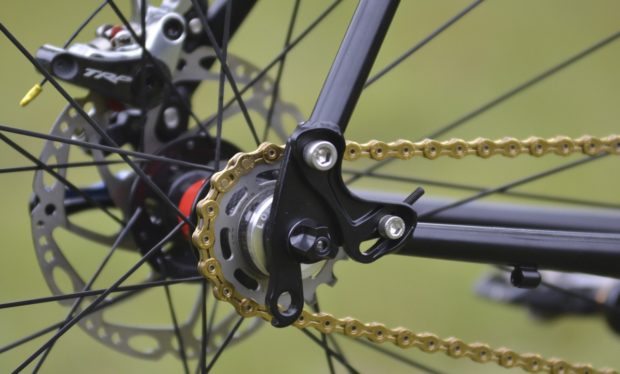
Swinging dropouts makes adjusting chain tension easy. Photo: Transition Bikes
Eccentric Hub
Only suitable for a small range of applications, White Industries ENO Eccentric hubs are designed specifically for single speed conversions without tensioners on frames with vertical dropouts. Similar to the Eccentric Bottom Bracket method, by providing an eccentric axle mount it is possible to adjust chain tension. As far as I am aware, White Industries are the only manufacturer producing an eccentric hub.
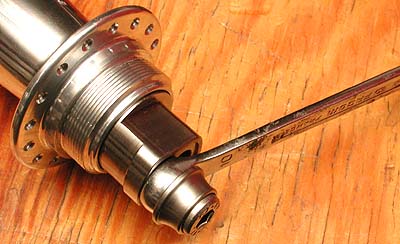
White Industries ENO Eccentric Hub. Photo: Sheldon Brown
Eccentric Dropouts
Not particularly common but ridiculously practical, eccentric dropouts give you the same functionality as as eccentric hub while allowing you to use a cheaper standard hub. I have been using eccentric dropouts on my Transition Bank pump track bike for around 4 years now and they are yet to slip!
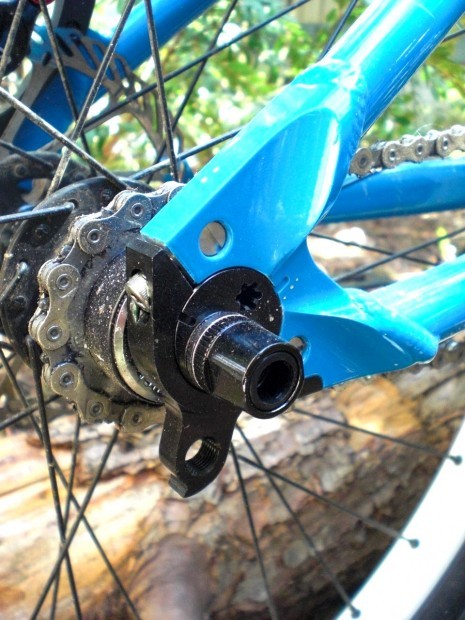
Transition Bank C.R.A.P. Eccentric Dropout
Single Speed Chainline Adjustment
If you are looking for a single speed drivetrain with minimal wear, noise and maximum efficiency, take the time to adjust your chain line. Single speed chainline adjustment only needs to be done once while converting your bike – once that has been done it’s “set and forget”.
Chainline refers to how straight the chain runs between the front chainring and the rear cog. To achieve perfect chainline adjustment, both chainring and cog should be on the same plane, so that the chain runs perfectly straight, avoiding side ward motion and undue stress.
For more information on single speed chainline adjustment, see Sheldon Brown’s article “Chainline on Bicycles without Derailleurs“.
Single Speed Conversion Guide
It’s been a long read so let’s get down to the good stuff – the guide on how to convert your bike to single speed! Most of this has been written many years ago so I will link you to the relevant guides at each step.
- Remove existing chainrings and install your non-ramped chainring
- Remove your shifters, derailleurs and shift cables
- Measure your chainline
- Remove the cassette and install your spacers and cog, taking into account chainline measurements
- Install your chain, ensuring the tensioning method is at it’s shortest length while installing the chain to allow for future chain growth
- Tension the chain
- Install a direct mount front derailleur cover (optional)
- Enjoy your newly converted single speed bike!
I hope my single speed conversion guide has been useful to you. If you have any questions on converting to single speed or if you think I missed something, please leave a comment or contact me on Twitter, Instagram or Facebook.
Not ready to go single speed but still want to simplify your drivetrain? Check out my Single Chainring 1x Drivetrain Guide!



[…] 1x drivetrain or single speed conversion […]
You forgot the always handy ghost chainring!
http://i17.photobucket.com/albums/b68/thecarnut/PICT0037.jpg
Great article
Thanks Fernando – honestly I hadn’t seen that one before! There’s always something to learn!
Thanks Jase for taking the time to create such an excellent guide, I am giving this a try.
I have an old Specialized Hardrock… the Rear Derailleur & Gear Hanger were bent out of shape, the other components badly worn. Given how MTB technology has evolved in the past 10+ years it was looking like a complete Group Set replacement (+ new disc-capable wheels). However this looks like a perfect cheap solution for me, and future-proof.
[…] do have some important considerations here. In my single speed conversion guide I discussed single speed gear ratio and gear inches. Explained […]